Hello everyone,
This post is a continuation of my previous post (i.e. PART-1) where I have explained how to make a paper pattern and cutting of Girl's Romper with Flutter Sleeve for a 2 year old.
Flutter sleeve Romper pattern for summer
In this post (i.e. PART-2), I have shown how to stitch the Girl's Romper.
* The pictures and instructions are offered here for free. Please don't repost any of my content without permission. Thanks!
Start by making the Flutter sleeves.
Stitching of Romper Flutter Sleeve & Top:-
Flutter sleeve Romper pattern for summer
Keep 2 pieces of sleeve right side facing each other and stitch outer curve at 1 cm. Then trim the seam at 0.5 cm and give slits on curve at a distance of 2 cms. (* when giving slits on curve don't cut on the stitch line).
Flutter sleeve Romper pattern for summer
Then turn the sleeves inside out and iron on the stitched curve. To hold the stitch curve, you can do an edge machining or any design stitch on outer curve of sleeves.
Do gather stitching on inner side of sleeve curves as shown and pull the stitches gradually to form gathers.
Flutter sleeve Romper pattern for summer
Attach button stand bands on both sides of Centre back as shown in above image.
Cut these button stands on straight grain of fabric.
Later, on Left side we will stitch the buttons & on right side we will make the button holes.
Flutter sleeve Romper pattern for summer
Place Front, Back and both Flutter sleeves flat open as shown above.
Stitch one side of sleeve to back arm curve and other side to front arm curve at 1 cm.
These stitch lines will be on inner side / wrong side of garment.
Flutter sleeve Romper pattern for summer
Once the sleeves are attached to Front & back, finish the arm curves by stitching bais band (3 cm width) at 1 cm over the stitched sleeves as shown above.
Flutter sleeve Romper pattern for summer
In above image I have shown a more magnified view of bais band attachment in 2 STEPS.
STEP-1 - shows bais band attached at 1 cm over the sleeve & arm curve.
STEP-2 - shows folding other open edge of bais band 1 cm in to do design stitch from one end to other of arm curve.
Finish all 4 arm curves in same way.
Flutter sleeve Romper pattern for summer
Once the arm curves are finished, stitch bais band (3 cms width) on neckline at 1 cm.
Fold the band 1 cm in at starting and ending of button stands as shown.
Flutter sleeve Romper pattern for summer
Once stitched at 1 cm, trim the seam to 0.5 cm & give slits at a distance of 2cms (slits will help in folding the band inside).
For neck piping, keep 0.5 cm on outer & inner side of neck & fold remaining 0.5 cm inside, iron well and do hemming / slip stitch.
Flutter sleeve Romper pattern for summer
Stitch both side seams of top at 1 cm. You can either do a plain seam or an overlock (optional).
Once the Romper Top with Flutter sleeves is ready, stitch the Romper Trouser.
Stitching of Romper Trouser:-
Flutter sleeve Romper pattern for summer
For stitching the romper trouser, place right side of back pieces facing right side of front pieces.
Stitch both inner legs at 1 cm and give notches on curve as shown.
Stitch both side seams of trouser at 1 cm.
Turn both legs inside out and iron the inner leg seam & side seam on right side.
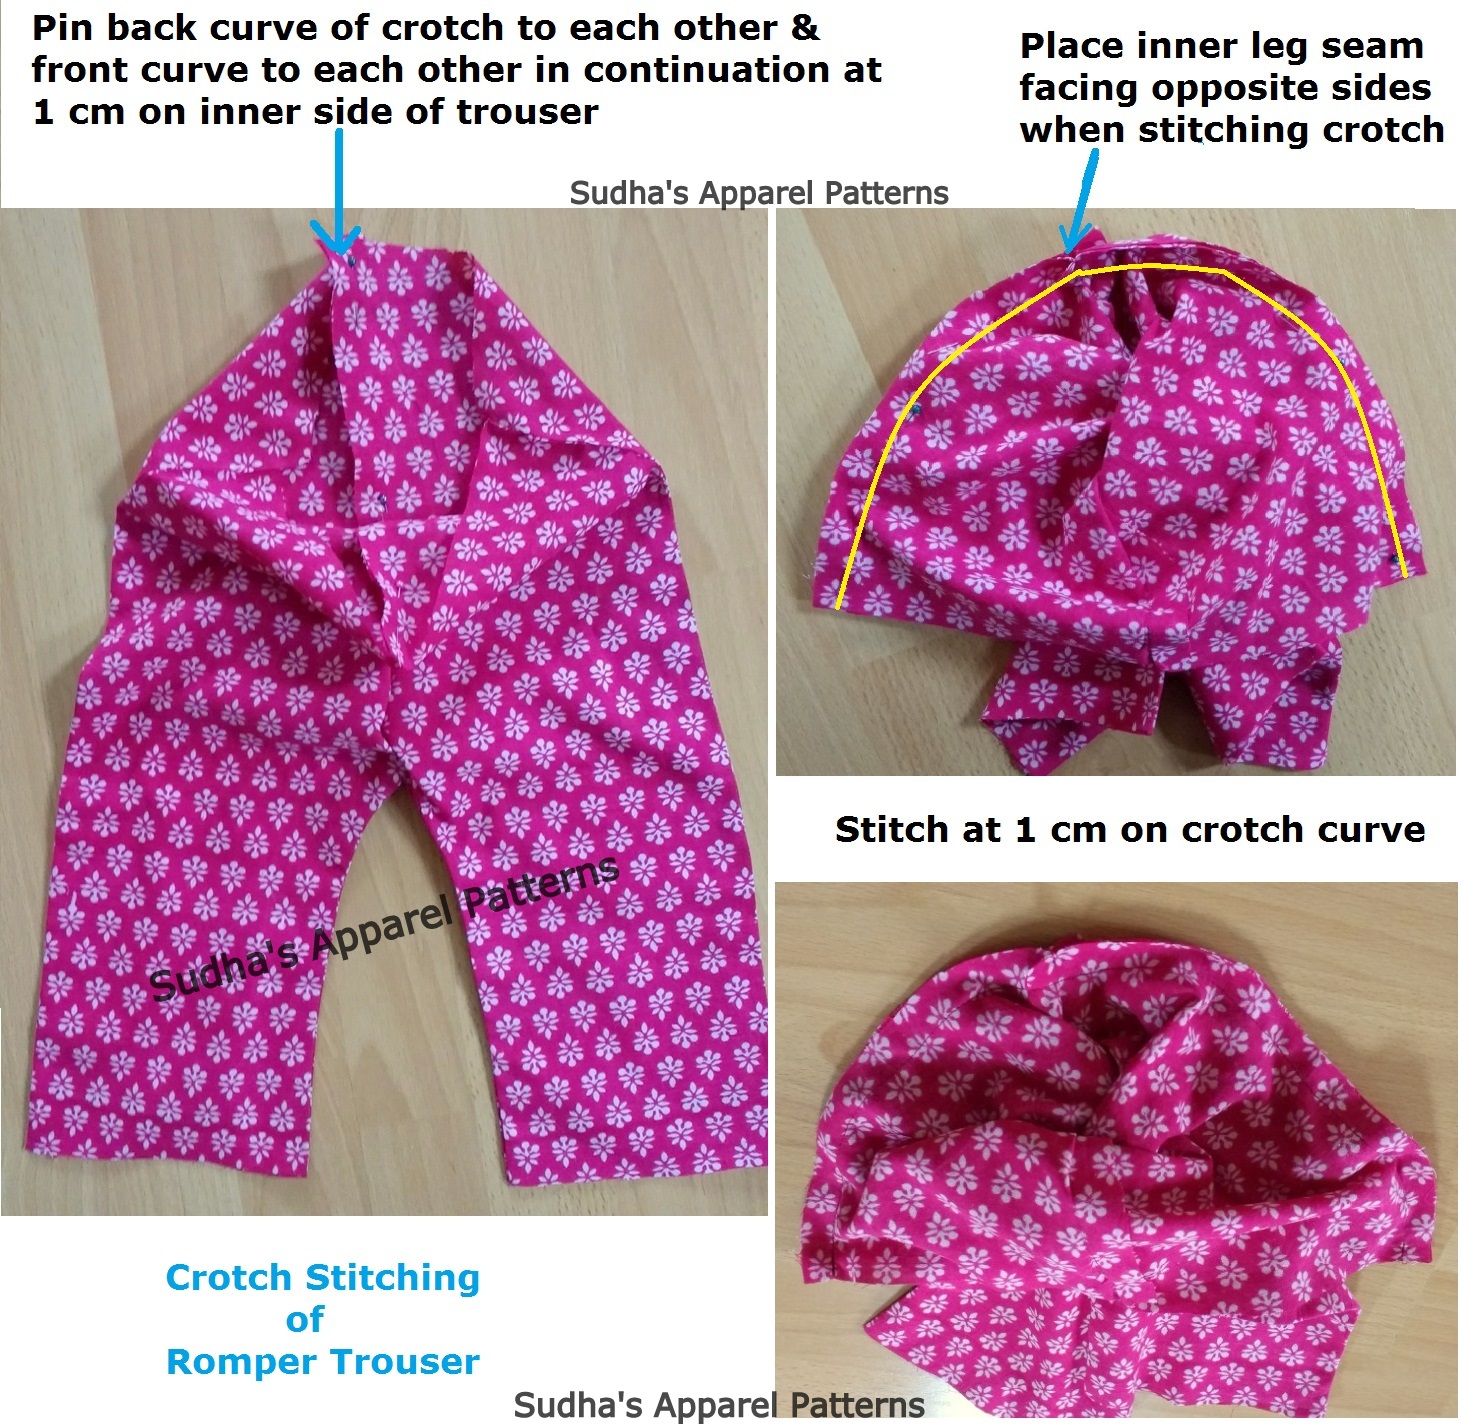
Once the inner legs & side seams are stitched, then stitch the crotch of trouser.
Flutter sleeve Romper pattern for summer
Once the crotch is stitched, finish the hem by rolling fabric in by 3 cms and then fold in 1 cm keeping 2 cms ready to do edge machining / design stitch on inner side of trouser hem.
Flutter sleeve Romper pattern for summer
Romper Trouser is ready to be attached to Top.
Flutter sleeve Romper pattern for summer
Attach top round waist to trouser round waist & stitch around at 1 cm.
When attaching the round waist, keep right side of Top facing right side of Trouser.
*Side seams of Top & Trouser should face opposite directions on both sides. You can even flatten the side seams.
Flutter sleeve Romper pattern for summer
To insert cord / elastic, cut a bais band by measuring the stitched round waist & add 2 cms to it. Keep the ready width of bais band 0.5 cm extra than elastic band width. (For example; if elastic width if 1/2" then add 0.5 cm to 1/2").
Also add 1 cm on each side of bais band width for stitching.
*When attaching the bais waist band on right side of romper with edge machining, keep the romper waist seam facing the Romper Top.
Elastic length measurement will be Round waist - 6 cms.
Flutter sleeve Romper pattern for summer
Romper with Flutter sleeves is almost ready. Just stitch some buttons & button holes at back button stand. You can put hook and eye at top to hold both ends of neck piping.
You can also embellish the front with some embroidery or buttons, though it's optional☺.
Flutter sleeve Romper pattern for summer
Voila! Finished Romper!!! Add your photos to the Facebook page so we can all enjoy them.
Did you like this tutorial? Wouldn’t it be nice to just say “thanks Shraddha for all your work on this”?
I love hearing from readers of my blog so please feel free to leave a comment letting me know what you thought about this post/make! Any hints or tips to improve my sewing are always much appreciated too!☺
If you enjoyed this post, I’d be very grateful if you’d help it spread by emailing it to a friend, or sharing it on Twitter or Facebook.
thank you very much ms.shraddha for the pattern and tutorial on how to stitch step by step with clear ,detail instructions. will keep revisiting your blog for learning more and more. best wishes.
I love hearing from readers of my blog so please feel free to leave a comment and let me know what you thought about this post/tutorial. Any tips / hints to improve my articles are always much appreciated too!


 Romper with Flutter sleeves is almost ready. Just stitch some buttons & button holes at back button stand. You can put hook and eye at top to hold both ends of neck piping.

thank you very much ms.shraddha for the pattern and tutorial on how to stitch step by step with clear ,detail instructions. will keep revisiting your blog for learning more and more.
ReplyDeletebest wishes.