FREE pattern of Bodice Block and Puffed Sleeve used for making Box Pleated Dress with Puffed sleeve and Princess line is given below -
February 24, 2022
February 20, 2022
February 17, 2022
Baby frock/dress with yoke - F R E E Pattern
Hello everyone,
I hope you all are safe.
Thank you very much for subscribing by signing the Free Newsletter of this blog.
I am back with one more simple pattern of a Baby frock with a yoke.

Fyi (in case you are new to the little blog of mine☺), in my previous few posts, I have explained pattern making of some very common saree blouse patterns like Simple Sleeveless Blouse, Basic Saree Blouse with Sleeve, Double Katori Blouse, One Piece Katori Blouse and also a simple stylized Sun-rays Neckline Saree Blouse, Saree Blouse with Back Smocking, High Neck Saree Blouse, Stand "V" Saree Blouse, Raglan Sleeve Saree Blouse, Blouse with Basque (Patti), Boat Neck Saree Blouse, Scallop Shaped Neckline and OFF Shoulder Raglan sleeve saree blouse with Armhole Princess line.
You can also visit my new YouTube Channel - "Sudha's Apparel Patterns" for more sewing videos. Please Subscribe to the Channel if you like it. ☺
So let's start with step-wise pattern making of a Baby frock with a yoke.
The Baby frock/dress pattern has (1) Straight yoke in front and back, (2) gathers below yoke in front and back (3) puffed sleeves. This frock will have a center back opening.
* The pictures and instructions are offered here for free. Please don't repost any of my content without permission. Thanks!
To make a Baby frock with a yoke and puffed sleeves, all measurements must be taken with great care for precise results. Please note below given measurements are not standard measurements so use them just as an example. Your measurements may differ depending upon your baby's body type.
Measurements required:- (in centimeters)
1. Length of the frock - 35 cms (or length as desired).
2. Shoulder - 10 cms.
3. Sleeve Length - 10 cms.
4. Round Arm - 16 cms.
5. Round Chest - 50 cms.
3. Sleeve Length - 10 cms.
4. Round Arm - 16 cms.
5. Round Chest - 50 cms.
6. Sleeve Hem Strip width - 2 cms.
* Answers for each step of formula calculation is given in brackets.
Steps of drafting:-
Front - (Yoke)
0-1 = 1/5 Round Chest + 1 cm (11 cms)
1-2 = 1.5 cms
* Yoke length is 0-2 = 11 + 1.5 = 12.5 cms
Front Bottom Gathers -
0-1 = 1/5 Round Chest + 1 cm (11 cms)
1-2 = 1.5 cms
* Yoke length is 0-2 = 11 + 1.5 = 12.5 cms
1-3 = 1/4 Round Chest + 4 cms (12.5 + 4 = 16.5 cms)
0-4 = Shoulder + 0.5 cm (10 + 0.5 = 10.5 cms)
4-5 & 2-5 = Join points as shown in image
5-6 = up by 1.5 cms
Join 2-6 with a slight curve line as shown for yoke hem
5-6 = up by 1.5 cms
Join 2-6 with a slight curve line as shown for yoke hem
4-7 = down by 1.5 cms
0-8 = 1/10 Round Chest - 1 cm (5 - 1 = 4 cms)
0-9 = 1/10 Round Chest (5 cms)
Join 9-8 for front neck curve
0-9 = 1/10 Round Chest (5 cms)
Join 9-8 for front neck curve
Join 7-8 for shoulder and
Join 6-7 for front arm curve as shown in image.
To draw front arm curve, mark mid-point of 6-7 and draw a line of 1 cm as shown.
Then draw the front arm curve passing over the 1 cm as shown.
Front Yoke is marked in RED ink in above pattern
Back - (Yoke)
0-10 = 2 cmsFront Yoke is marked in RED ink in above pattern
Back - (Yoke)
6-11 = 1.5 cms
Join 2-11 with a slight curve line as shown for yoke hem
Join 8-10 for back neck curve
Join 7-11 for back arm curve as shown in image
Back Yoke is marked in BLUE ink in above pattern
Front Bottom Gathers -
3-12 = down by 1.5 cms
12-13 = Round Chest x 3 / 4 (50 x 3 = 150 / 4 = 37.5 cms) can be approx. 40 cms
13-14 = Full length - Yoke length + 1 cm (35 - 12.5 + 1 = 23.5 cms)
14-15 = down by 4 cms for dress hemline
Join 15-16 and 12-16 as shown
16-17 = up by 4 cms for dress hemline
14-17 = make dotted line for hemline fabric fold
12-18 = down by 1.5 cms
18-19 and 5-19 = Join as shown
5-18 = Join for remaining front arm curve marked in RED ink
Back Bottom Gathers -
5-20 = 1.5 cms
20-18 = Join for remaining back arm curve marked in BLUE ink
Puffed Sleeve -
Make the sleeve pattern on folded paper.
0-1 = down by 2 cms
1-2 = Sleeve length + 1 cm (10 - 1 = 9 cms)
0-3 and 2-4 = 10 cms
Join 3-4 in straight line as shown
3-5 and 4-6 = 1/4 Round Chest (12.5 cms)
5-6 = Join points as shown
0-1 = down by 2 cms
1-2 = Sleeve length + 1 cm (10 - 1 = 9 cms)
0-3 and 2-4 = 10 cms
Join 3-4 in straight line as shown
3-5 and 4-6 = 1/4 Round Chest (12.5 cms)
5-6 = Join points as shown
5-7 = down by 2 cms
The fabric used:- For making the baby frock, you can use thin printed Poplin, 2 x 2, Khadi, Cambric, Organdy, Taffeta, Satin, Voile, etc. However, if you are a beginner, prefer using Cotton Voile fabric. You can also use different fabrics (i.e. plain, printed, embroidered, etc.) to get variations.1-7 = Draw straight line
7-8 = 1/10 Round Chest + 1.5 cms (5 + 1.5 = 6.5 cms)
6-9 = up by 1.5 cms
Join 9-4 in a slight curve as shown
9-10 = mark 1 cm
Join 8-10 for sleeve side seam
8-11 = 1/2 of 3-8
3-12 = 1/4 of 3-8
11-13 = 1.5 cms (draw perpendicular to 3-8 as shown)
12-14 = 1.5 cms (draw perpendicular to 3-8 as shown)
8-15 = mark 1.5 cms
Join 3-12-13-8 for front sleeve arm curve marked in RED ink in above pattern
Join 3-14-15-8 for back sleeve arm curve marked in BLUE ink in above pattern
Sleeve hem piping:-
0-1 = sleeve hem strip width + 1 cm (2 + 1 = 3 cms)
1-2 & 0-3 = 1/2 Round Arm + 2 cms (8 + 2 = 10 cms)
Join 2-3
Some Tips:- when preparing the fabric for draft placement & cutting:--
1) If using the basic woven cotton material, then straighten the fabric by slightly stretching it diagonally to align the warp & weft at a right angle.
2) Iron the fabric always to make it crease free prior to marking/placing the draft over it.
3) If you are a beginner, prefer making the draft on paper and then pin it to the fabric.
I hope you liked this post of a simple baby frock pattern.
If you liked it then Pin it!☺
If you enjoyed this post, please spread by emailing it to a friend, or sharing it on Pinterest, Twitter, or Facebook. Thank you!
Stay connected on
I love hearing from readers of my blog so please feel free to leave a comment and let me know what you thought about this or any other post/tutorial given in the blog. Any tips/hints to improve my articles are always much appreciated too!☺☺
Happy Sewing!
July 10, 2018
How to make an OFF Shoulder Raglan sleeve saree blouse with Armhole Princess line? F R E E Pattern
Hello everyone,
I am back with one more pattern of saree blouse and this time it is a stylized an OFF Shoulder Raglan sleeve saree blouse with armhole princess line. This pattern was requested by one of the subscribers.
Fyi (in case you are new to little blog of mine☺), in my previous few posts, I have explained pattern making of some very common saree blouse patterns like Simple Sleeveless Blouse, Basic Saree Blouse with Sleeve, Double Katori Blouse, One Piece Katori Blouse and also a simple stylized Sun-rays Neckline Saree Blouse, Saree Blouse with Back Smocking, High Neck Saree Blouse, Stand "V" Saree Blouse, Raglan Sleeve Saree Blouse, Blouse with Basque (Patti), Boat Neck Saree Blouse and Scallop Shaped Neckline.
You can also visit my new YouTube Channel - "Sudha's Apparel Patterns" for more sewing videos. Please Subscribe the Channel if you like it. ☺
So let's start with step-wise pattern making of yet another stylized OFF Shoulder Raglan sleeve saree blouse with armhole princess line.
The Blouse pattern has (1) Off-Shoulder, (2) Raglan sleeve and (3) Armhole princess line in Front. This blouse will have a back opening with darts.
* The pictures and instructions are offered here for free. Please don't repost any of my content without permission. Thanks!
To make a stylised OFF Shoulder Raglan sleeve saree blouse with armhole princess line, all measurements must be taken with great care for precise results.
Some Tip:- It is very important that you wear your best-fit undergarment (i.e. Bra) in order to get the most accurate measurements. If you think the bra is loose, adjust the straps accordingly, before taking blouse measurements.
1. Length of the blouse - Measure from centre of front shoulder passing over the bust point to 5 to 6 cms above the waistline.
2. Round Chest - Take it by passing the tape measure around the body under the armpits. Make sure that the tape at back is over the shoulder blades, parallel to the ground and not loose or hanging at the back.
3. Round Bust - Measure around the body at the fullest point of bust. Do not allow the measuring tape to fall at back. The tape should pass on the most protruding part of the bust.
4. Below Round Bust - Measure around the body and below the bust.
5. Shoulder - Measure from back neck bone to shoulder bone.
6. Distance between bust points - It is the distance between two bust points measured horizontally.
7. Shoulder to bust point - Measure from shoulder at neck to bust point. Also called bust height.
8. Round Neck - Measure around the neck touching front collarbone moderately tight.
9. Sleeve Length - Measure the length by keeping the measuring tape from neck over shoulder till the fullest part of the arm.
10. Round Arm - Measure around the fullest part of the arm which is between the shoulder and the elbow.
Steps of drafting:-
BACK -
3-16 = 4 to 6 cms
Join 15-16 with line
17 = Midpoint of 15-16
18 = Midpoint of 15-17
19 = Midpoint of 16-17
Draw perpendicular of 0.5 cm at point 18 & 19 (as shown in above image).
Draw raglan sleeve curve from 15-17-16 passing over both perpendiculars of 0.5 cm (refer image).
Marking of Off-Shoulder:-
14-20 = 10 cms
12-21 = 3 to 4 cms
Join 20-21 with a curve (refer above image)
FRONT -
STEP- 1
0-1 = Length of blouse + 1 cm
0-2 = 1/5 Round Chest
2-3 & 1-4 = 1/4 Round Bust + 2 cms
3-4 = Join in straight line
1-5 = 1/4 Below Round Bust + 2 cms
Waist Dart -
1-6 = 1/10 Round Bust - 1 cm
6-7 = 2.5 cms (dart width)
7-8 = Midpoint of 6-7
8-9 = 1/10 Round Bust + 2 cms
Join 6-9-7 in slant line for dart
0-10 & 2-11 = Shoulder + 0.5 cm
10-11 = Join in straight line
10-12 = Down by 2 cms
0-13 = 1/6 Round Neck + 1 cm
0-14 = 1 cm
Join 13-14 for Neck curve
12-3 for Arm curve
12-13 for Shoulder
3-5 for Side seam
Marking of Raglan Piece:-
14-15 = 1/3rd of 13-143-16 = 4 to 6 cms
Join 15-16 with line
17 = Midpoint of 15-16
18 = Midpoint of 15-17
19 = Midpoint of 16-17
Draw perpendicular of 0.5 cm at point 18 & 19 (as shown in above image).
Draw raglan sleeve curve from 15-17-16 passing over both perpendiculars of 0.5 cm (refer image).
Marking of Off-Shoulder:-
14-20 = 10 cms
12-21 = 3 to 4 cms
Join 20-21 with a curve (refer above image)
*Trace and separate raglan piece and Back piece with the dart as shown in above image.
STEP- 1
0-1 = Length of blouse + 1 cm
1-2 = 2 cms (for shaping)
0-3 = 1/5 Round Chest
3-4 & 2-5 = 1/4 Round Bust + 4 cms
4-5 = Join in straight line
2-6 & 1-7 = 1/4 Below Round Bust + 4 cms
Waist Dart -
2-8 = 1/2 Distance between bust points
8-9 = 2 cms & 8-10 = 2 cms (dart width)
8-11 = 1/10 Round Bust + 2 cms
Join 9-11-10 in slant line for dart
0-12 & 3-13 = Shoulder + 0.5 cm
12-13 = Join in straight line
12-14 = Down by 2 cms
13-15 = Up by 2.5 cms
0-16 = 1/6 Round Neck + 1 cm
0-17 = 1/6 Round Neck + 1 cm
Join 16-17 for Neck curve
4-15-14 for Arm curve
4-7-6 for Side seam
Side seam Dart -
4-20 = 1/16 Round Bust + 1 cm
18-19 = 2 cms (dart width)
19-20 = Midpoint of 18-19
20-21 = 1/8 Round Bust + 2 cms
Join 18-21-19 in slant line for dart
- Draw a straight line from 11 up towards shoulder to mark 22 (refer STEP-1 FRONT image).
22-23 = Mark shoulder to bust point measurement.
23-24 = Mark 1/2 distance between bust point by drawing a horizontal line towards centre front.
Armhole Dart marking -
4-25 = 1/3rd of 4-14
(*measure front armhole curve with measure tape & whatever is "x" measurement, take its 1/3rd)
{for example; if front armhole is 15 cms, then it's 1/3rd will be 5 cms}
- Join 25-23 with a line to mark armhole dart.
- Mark midpoint on this slant line & draw perpendicular of 1 cm on it (refer STEP-1 FRONT image).
- Draw a curve from 25 to 23 passing through this perpendicular. The red curve marked in STEP-1 is armhole dart.
STEP - 2
Marking of Armhole Princess Line:-
- Cut on the curve of 25-23 & fold side seam dart (i.e. 18-21-19).
*When side seam dart is folded, armhole dart slit will open.
STEP - 3
- Extend waist dart till bust point. i.e. join 9-23 and 10-23' to form princess line.
STEP - 4
- Mark & trace armhole princess line pieces i.e.
For Side panel - trace 4-25-23-9-6-4 and
For Centre Panel - trace 25'-14-16-17-2-10-23'-25'.
STEP - 5
Marking of Raglan Piece:-17-26 = 1/3rd of 16-17
4-27 = 4 to 6 cms
Join 26-27 with line
28 = Midpoint of 26-27
29 = Midpoint of 26-28
30 = Midpoint of 27-28
Draw perpendicular of 0.5 cm at point 29 & 30 (as shown in above image).
Draw raglan sleeve curve from 26-28-27 passing over both perpendiculars of 0.5 cm (refer image).
STEP - 6
Marking of Off-Shoulder:-
17-32 = 10 cms
14-31 = 3 to 4 cms
Join 31-32 with a curve (refer above image)
STEP - 7
*Trace & separate raglan piece and Front pieces with armhole princess line as shown in the above image.
SLEEVE -

0-1 = Length of Sleeve + 1 cm
1-2 = 3 cms
0-3 = 1/5 Round Chest + 2 cms
3-4 & 2-4 = Join points
1-5 = Draw straight line
3-6 = 1/10 Round Chest + 1 cm
1-7 = 1/2 Round Arm + 2 cms
7-8 & 2-8 = Join points
6-9 & 0-10 = 1/4 of 0-6
10-11 = 2 cms
9-12 = 2 cms
6-13 = 2 cms
Join 0-11-13 (Back sleeve curve)
Join 0-12-6 (Front sleeve curve)
Join 6-7-8 for Sleeve side seam
STEP-2 - Open the folded paper to cut the front curve (see image)
STEP-3 - Final sleeve pattern with Front and Back curve.
Making of Raglan Sleeve:-
- To make Raglan sleeve, take raglan pieces of Front and Back (as shown in the above image) and place them above sleeve draft (STEP-3) as shown in below image.
- Place both raglan pieces of Front & Back 3 to 4 cms away from the centre of the sleeve curve (refer below image).
- Join both ends of 3 to 4 cms by a slight curve (as shown in below image)
- Armhole (AH) of raglan pieces should face Sleeve curve.
*******************
Final Pieces of OFF Shoulder Raglan sleeve saree blouse with Armhole Princess line
*******************
The fabric used:- For making this style of saree blouse, you can use thin Poplin, 2 x 2, Khadi, Cambric, Organdy, Taffeta, Satin, Voile etc. However, if you are a beginner, prefer using Cotton Voile fabric. You can also use different fabrics (i.e. plain, printed, embroidered etc) to get variations.
Some Tips:- when preparing the fabric for draft placement & cutting:--
1) If using the basic woven cotton material, then straighten the fabric by slightly stretching it diagonally to align the warp & weft at a right angle.
2) Iron the fabric always to make it crease free prior to marking/placing the draft over it.
3) If you are a beginner, prefer making the draft on paper and then pin it to the fabric.
*Do try this tricky yet beautiful pattern and let me know in the comments box below. :)
I hope you liked this post of a simple and yet stylized blouse pattern.
If you liked it then Pin it!☺
If you enjoyed this post, please spread by emailing it to a friend, or sharing it on Pinterest, Twitter, Google+ or Facebook. Thank you!
Stay connected on
I love hearing from readers of my blog so please feel free to leave a comment and let me know what you thought about this or any other post/tutorial given in the blog. Any tips/hints to improve my articles are always much appreciated too!☺☺
Happy Sewing!
May 3, 2018
How to make a SCALLOP shaped Neckline Saree Blouse? FREE Pattern - Designer Saree Blouse
![]() |
Scalloped Neckline Saree Blouse |
Hello everyone,
Before I begin today's post, I would like to thank all the lovely subscribers of this blog who have joined the free Newsletter of my blog. I hope you all are notified every time I post an article about different garment patterns.🙏
With this post, I am back with one more pattern of saree blouse and this time it is a stylized deep neckline (scallop shaped) saree blouse. This pattern was requested by one of the subscribers who had sent me below given design for reference.
![]() |
Subscriber requested pattern |
You can also visit my new YouTube Channel - "Sudha's Apparel Patterns" for more sewing videos. Please Subscribe the Channel if you like it. ☺
So let's start with step-wise pattern making of yet another Scalloped shaped Deep Neck Saree Blouse.
This deep neckline saree blouse will have only big waist dart in front and basic waist dart at back. You can give any neckline shape of your choice but I have given a slightly wavy scalloped shape to both Front and Back neckline. I have also given slightly wavy shape to the hemline of blouse but you may keep it basic. This blouse will have a back opening.
* The pictures and instructions are offered here for free. Please don't repost any of my content without permission. Thanks!
To make a stylised Deep Neck Blouse, all measurements must be taken with great care for precise results.
Some Tip:- It is very important that you wear your best-fit undergarment (i.e. Bra) in order to get the most accurate measurements. If you think the bra is loose, adjust the straps accordingly, before taking blouse measurements.
You can wear a padded bra, though it's optional.
Measurements required:- (in centimetres)
1. Length of the blouse - Measure from centre of front shoulder passing over the bust point to 5 to 6 cms above the waistline.
2. Round Chest - Take it by passing the tape measure around the body under the armpits. Make sure that the tape at back is over the shoulder blades, parallel to the ground and not loose or hanging at the back.
3. Round Bust - Measure around the body at the fullest point of bust. Do not allow the measuring tape to fall at back. The tape should pass on the most protruding part of the bust.
4. Below Round Bust - Measure around the body and below the bust.
5. Shoulder - Measure from back neck bone to shoulder bone.
6. Distance between bust points - It is the distance between two bust points measured horizontally.
7. Shoulder to bust point - Measure from shoulder at neck to bust point. Also called bust height.
8. Round Neck - Measure around the neck touching front collarbone moderately tight.
7. Shoulder to bust point - Measure from shoulder at neck to bust point. Also called bust height.
8. Round Neck - Measure around the neck touching front collarbone moderately tight.
Steps of drafting:-
BACK -
0-1 = Length of blouse + 1 cm
FRONT -
0-2 = 1/5 Round Chest
2-3 & 1-4 = 1/4 Round Bust + 2 cms
3-4 = Join in straight line
1-5 = 1/4 Below Round Bust + 2 cms
Waist Dart -
1-6 = 1/10 Round Bust - 1 cm
6-7 = 2.5 cms (dart width)
7-8 = Midpoint of 6-7
8-9 = 1/10 Round Bust + 2 cms
Join 6-9-7 in slant line for dart
0-10 & 2-11 = Shoulder + 0.5 cm
10-11 = Join in straight line
10-12 = Down by 2 cms
0-13 = 1/6 Round Neck + 1 cm
Join 12-13 with line
12-14 = 3 cms Shoulder
12-3 for Arm curve
3-5 for Side seam
Scallop neckline shaping:
1-15 = 5 cms (button stand)
Join 14-15 with a slight curve
Draw scallop design for neckline using this slight curve marked from 14-15 as a baseline.
Scallop neckline shaping:
1-15 = 5 cms (button stand)
Join 14-15 with a slight curve
Draw scallop design for neckline using this slight curve marked from 14-15 as a baseline.
1-2 = 2 cms (for shaping)
0-3 = 1/5 Round Chest
3-4 & 2-5 = 1/4 Round Bust + 4 cms
4-5 = Join in straight line
2-6 = 1/4 Below Round Bust + 4 cms
Join 4-6 for Side seam
0-7 & 3-8 = Shoulder + 0.5 cm
7-8 = Join in straight line
7-9 = Down by 2 cms
8-10 = Up by 2.5 cms
Join 4-10-9 for Arm curve
0-11 = 1/6 Round Neck + 1 cm
Join 9-11 with line
9-12 = 3 cms Shoulder
Join 4-10-9 for Arm curve
0-11 = 1/6 Round Neck + 1 cm
Join 9-11 with line
9-12 = 3 cms Shoulder
0-13 = 24 cms Neck depth or as desired
Scallop neckline shaping:
Join 12-13 with a slight curve
Draw scallop design for neckline using this slight curve marked from 12-13 as a baseline.
Join 12-13 with a slight curve
Draw scallop design for neckline using this slight curve marked from 12-13 as a baseline.
Waist Dart -
2-14 = 1/2 Distance between bust points
14-15 = 2.5 cms & 15-16 = 2.5 cms (dart width)
11-17 = Shoulder to bust point
Join 16-17-14 in slant line for dart
The fabric used:- For making a Deep Neck saree blouse, you can use thin Poplin, 2 x 2, Khadi, Cambric, Organdy, Taffeta, Satin, Voile etc. However, if you are a beginner, prefer using Cotton Voile fabric. You can also use different fabrics (i.e. plain, printed, embroidered etc) to get variations.
Some Tips:- when preparing the fabric for draft placement & cutting:--
1) If using the basic woven cotton material, then straighten the fabric by slightly stretching it diagonally to align the warp & weft at the right angle.
2) Iron the fabric always to make it crease free prior to marking/placing the draft over it.
3) If you are a beginner, prefer making the draft on paper and then pin it to the fabric.
*Once you are successfully making a basic blouse you can do variations with use of different neckline shapes for front and back; different types of sleeves; try making with different fabrics like printed/ embroidered/ checkered/striped etc. Do try and let me know in the comments box below. :)
I hope you liked this post of a simple and yet stylized blouse pattern.
If you liked it then Pin it!☺
If you enjoyed this post, please spread by emailing it to a friend, or sharing it on Pinterest, Twitter, Google+ or Facebook. Thank you!
Stay connected on
I love hearing from readers of my blog so please feel free to leave a comment and let me know what you thought about this or any other post/tutorial given on the blog. Any tips/hints to improve my articles are always much appreciated too!☺☺
Happy Sewing!
March 10, 2018
How to make Boat Neck Saree Blouse? FREE Pattern
Hello everyone,
I am back with yet another pattern of saree blouse and this time it is a blouse with Boat Neckline. Before I begin the post, I would like to thank one of the subscribers for sending in the request of demonstrating this pattern in my blog. Thank you. 🙏
Fyi (in case you are new to little blog of mine☺), in my previous few posts, I have explained pattern making of some very common saree blouse patterns like Simple Sleeveless Blouse, Basic Saree Blouse with Sleeve, Double Katori Blouse, One Piece Katori Blouse and also a simple stylized Sun-rays Neckline Saree Blouse, Saree Blouse with Back Smocking, High Neck Saree Blouse, Stand "V" Saree Blouse, Raglan Sleeve Saree Blouse and Blouse with Basque (Patti).
You can also visit my new YouTube Channel - "Sudha's Apparel Patterns" for more sewing videos. Please Subscribe the Channel if you like it. ☺
So let's start with step-wise pattern making of Boat Neck Saree Blouse.
According to Wikipedia, A boat neck also called a bateau neck or Sabrina neckline is a wide neckline that runs horizontally, front and back, almost to the shoulder points, across the collarbone. It is traditionally used in nautically inspired sweaters and knitwear but is also featured in more elegant cocktail dresses and eveningwear.
This neckline pattern is also widely used for various Saree blouses, Kurtis etc.
Boat neckline is apt for ladies with narrow shoulders and low bust line. It's a high neck design blouse which has a stylish back having simple eyehole design. This neckline creates an illusion of a fuller bust line. You may combine this incredibly sophisticated high neckline blouse with any cotton/silk sarees or any one from your formal collection.
* The pictures and instructions are offered here for free. Please don't repost any of my content without permission. Thanks!
To make a Boat Neck Blouse, all measurements must be taken with great care for precise results.
Some Tip:- It is very important that you wear your best-fit undergarment (i.e. Bra) in order to get the most accurate measurements. If you think the bra is loose, adjust the straps accordingly, before taking blouse measurements.
You can wear a padded bra, though it's optional.
Measurements required:- (in centimetres)
1. Length of the blouse - Measure from centre of front shoulder passing over the bust point to 5 to 6 cms above the waistline.
2. Round Chest - Take it by passing the tape measure around the body under the armpits. Make sure that the tape at back is over the shoulder blades, parallel to the ground and not loose or hanging at the back.
3. Round Bust - Measure around the body at the fullest point of bust. Do not allow the measuring tape to fall at back. The tape should pass on the most protruding part of the bust.
4. Below Round Bust - Measure around the body and below the bust.
5. Shoulder - Measure from back neck bone to shoulder bone.
6. Sleeve Length - Measure the length by keeping the measuring tape from neck over the shoulder to 2-3 cms above the elbow.
7. Round Arm - Measure around the fullest part of the arm which is between the shoulder and the elbow.
8. Round Neck - Measure around the neck touching front collarbone moderately tight.
9. Distance between bust points - It is the distance between two bust points measured horizontally.
Steps of drafting:-
0-2 = 1/5 Round Chest
2-3 & 1-4 = 1/4 Round Bust + 3 cms
3-4 = Join in straight line
1-5 = 1/4 Below Round Bust + 4 cms
Waist Dart -
Waist Dart -
1-6 = 1/10 Round Bust - 1 cm
6-7 = 2.5 cms (dart width)
7-8 = Midpoint of 6-7
8-9 = 1/8 Round Bust
Join 6-9-7 in slant line for dart
0-10 & 2-11 = Shoulder + 0.5 cm
10-11 = Join in straight line
10-12 = Down by 2 cms
10-13 = 5 cms (shoulder width)
Join 12-13 for Shoulder
0-14 = 3 cms (neck depth)
Join 13-14 for Boat Neck curve (*should not be deep curve unlike round neckline)
12-3 for Arm curve
3-5 for Side seam
For Eyehole shaping:--
2-14 = 2-15
2-16 = 4 to 5 cms
Join 14-16-15 with a slight curve making eyehole shaping
*This blouse will have a back opening with button at 14 and between 1-15.*
*To have a well-defined neckline, stitch this neckline and eyehole shaping using fusible canvas/buckram .*
* Instead of eyehole shaping you can also style the blouse back with leaf shape/round/diamond shape.
1-2 = 2 cms (for shaping)
0-3 = 1/5 Round Chest
3-4 & 2-5 = 1/4 Round Bust + 4 cms
4-5 = Join in straight line
2-6 = 1/4 Below Round Bust + 6 cms
Waist Dart -
2-7 = 1/2 Distance between bust points
7-8 = 4 cms (dart width)
8-9 = Midpoint of 7-8
9-10 = 1/8 Round Bust + 2 cms
Join 8-10-7 in slant line for dart
0-11 & 3-12 = Shoulder + 0.5 cm
11-12 = Join in straight line
11-13 = Down by 2 cms
12-14 = Up by 2.5 cms
11-15 = 5 cms (shoulder width)
Join 13-15 for Shoulder
0-16 = Neck depth 5 cms (if you wish to hide collar bone) &/or 7 cms (if you wish to show collar bone)
Join 15-16 for Boat Neck curve (*should not be deep curve unlike round neckline)
4-14-13 for Arm curve
4-6 for Side seam
Side seam Dart -
4-17 = 1/16 Round Bust + 1 cm
17-18 = 2 cms (dart width)
18-19 = Midpoint of 18-19
19-20 = 1/8 Round Bust + 2 cms
Join 17-20-18 in slant line for dart
Centre Front Dart -
Centre Front Dart -
3-21 = 1/16 Round Bust + 1 cm
21-22 = 1.5 cms (dart width)
22-23 = Midpoint of 21-22
23-24 = 1/10 Round Bust
Join 21-24-22 in slant line for dart
SLEEVE -
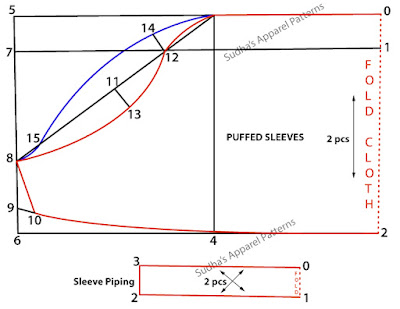
STEP-1 - Make the sleeve pattern on folded paper.
0-1 = Length of Sleeve + 1 cm
1-2 = 3 cms
0-3 = 1/5 Round Chest + 2 cms
3-4 & 2-4 = Join points
1-5 = Draw straight line
3-6 = 1/10 Round Chest + 1 cm
1-7 = 1/2 Round Arm + 2 cms
7-8 & 2-8 = Join points
6-9 & 0-10 = 1/4 of 0-6
10-11 = 2 cms
9-12 = 2 cms
6-13 = 2 cms
Join 0-11-13 (Back sleeve curve)
Join 0-12-6 (Front sleeve curve)
Join 6-7-8 for Sleeve side seam
STEP-2 - Open the folded paper to cut the front curve (see image)
STEP-3 - Final sleeve pattern with Front and Back curve.
Fabric used:- For making a Boat Neck saree blouse, you can use thin Poplin, 2 x 2, Khadi, Cambric, Organdy, Taffeta, Satin, Voile etc. However, if you are a beginner, prefer using Cotton Voile fabric. You can also use different fabrics (i.e. plain, printed, embroidered etc) to get variations.
Some Tips:- when preparing the fabric for draft placement & cutting:--
1) If using a basic woven cotton material, then straighten the fabric by slightly stretching it diagonally to align the warp & weft at a right angle.
2) Iron the fabric always to make it crease free prior to marking/placing the draft over it.
3) If you are a beginner, prefer making the draft on paper and then pin it to the fabric.
*Once you are successful making a basic blouse you can do variations with use of different types of sleeves; try making with different fabrics like printed/ embroidered/ checkered/striped etc. Do try and let me know in the comments box below.☺
I hope you liked this post of a simple and yet stylized blouse pattern.
If you liked it then Pin it!☺
If you enjoyed this post, please spread by emailing it to a friend, or sharing it on Pinterest, Twitter, Google+ or Facebook. Thank you!
Stay connected on
I love hearing from readers of my blog so please feel free to leave a comment and let me know what you thought about this pattern or any other post/tutorial given on the blog. Any tips/hints to improve my articles are always much appreciated too!☺☺
Happy Sewing!
Subscribe to:
Posts (Atom)
I love hearing from readers of my blog so please feel free to leave a comment and let me know what you thought about this post/tutorial. Any tips / hints to improve my articles are always much appreciated too!