I love hearing from readers of my blog so please feel free to leave a comment and let me know what you thought about this or any other post/tutorial given in the blog. Any tips/hints to improve my articles are always much appreciated too!☺☺
Hi there, welcome to Sudha's Apparel Patterns. In this video, I have shown "How to make a Simple TOTE BAG from Spoonflower Fill-A-Yard design swatches?"
If you want to buy individual designs shown in this video on fabric, wallpaper or home décor products, then please check the Shop link given below -
I love hearing from readers of my blog so please feel free to leave a comment and let me know what you thought about this or any other post/tutorial given in the blog. Any tips/hints to improve my articles are always much appreciated too!☺☺
Hi there, welcome to Sudha's Apparel Patterns. In this video, I have shown "How to make a Simple TOTE BAG from Spoonflower Fill-A-Yard design swatches?"
If you want to buy individual designs shown in this video on fabric, wallpaper or home décor products, then please check the Shop link given below -
I love hearing from readers of my blog so please feel free to leave a comment and let me know what you thought about this or any other post/tutorial given in the blog. Any tips/hints to improve my articles are always much appreciated too!☺☺
You can also visit my new YouTube Channel - "Sudha's Apparel Patterns" for more sewing videos. Please Subscribe to the Channel if you like it. ☺
So let's start with step-wise pattern making of a Baby frock with a yoke.
The Baby frock/dress pattern has (1) Straight yoke in front and back, (2) gathers below yoke in front and back (3) puffed sleeves. This frock will have a center back opening.
* The pictures and instructions are offered here for free. Please don't repost any of my content without permission. Thanks!
To make a Baby frock with a yoke and puffed sleeves, all measurements must be taken with great care for precise results. Please note below given measurements are not standard measurements so use them just as an example. Your measurements may differ depending upon your baby's body type.
Measurements required:-(in centimeters) 1. Length of the frock - 35 cms (or length as desired).
4-5 & 2-5 = Join points as shown in image 5-6 = up by 1.5 cms Join 2-6 with a slight curve line as shown for yoke hem
4-7 = down by 1.5 cms
0-8 = 1/10 Round Chest - 1 cm (5 - 1 = 4 cms) 0-9 = 1/10 Round Chest (5 cms) Join 9-8 for front neck curve
Join 7-8 for shoulder and
Join 6-7 for front arm curve as shown in image.
To draw front arm curve, mark mid-point of 6-7 and draw a line of 1 cm as shown.
Then draw the front arm curve passing over the 1 cm as shown. Front Yoke is marked in RED ink in above pattern
Back - (Yoke)
0-10 = 2 cms
6-11 = 1.5 cms Join 2-11 with a slight curve line as shown for yoke hem
Join 8-10 for back neck curve
Join 7-11 for back arm curve as shown in image
Back Yoke is marked in BLUE ink in above pattern
Front Bottom Gathers -
3-12 = down by1.5 cms
12-13 = Round Chest x 3 / 4 (50 x 3 = 150 / 4 = 37.5 cms)can be approx. 40 cms
13-14 = Full length - Yoke length + 1 cm (35 - 12.5 + 1 = 23.5 cms)
14-15 = down by 4 cms for dress hemline
Join 15-16 and 12-16as shown
16-17 = up by4 cms for dress hemline
14-17 = make dotted line for hemline fabric fold
12-18 = down by1.5 cms
18-19 and 5-19 = Joinas shown
5-18 = Join for remaining front arm curve marked inREDink
Back Bottom Gathers -
5-20 = 1.5 cms
20-18 = Join for remaining back arm curve marked in BLUE ink
Puffed Sleeve -
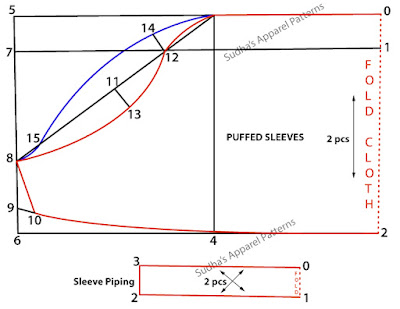
Make the sleeve pattern on folded paper. 0-1 = down by 2 cms 1-2 = Sleeve length + 1 cm (10 - 1 = 9 cms) 0-3 and 2-4 = 10 cms Join 3-4 in straight line as shown 3-5 and 4-6 = 1/4 Round Chest (12.5 cms) 5-6 = Join points as shown
The fabric used:- For making the baby frock, you can use thin printed Poplin, 2 x 2, Khadi, Cambric, Organdy, Taffeta, Satin, Voile, etc. However, if you are a beginner, prefer using Cotton Voile fabric. You can also use different fabrics (i.e. plain, printed, embroidered, etc.) to get variations.
Some Tips:- when preparing the fabric for draft placement & cutting:--
1) If using the basic woven cotton material, then straighten the fabric by slightly stretching it diagonally to align the warp & weft at a right angle.
2) Iron the fabric always to make it crease free prior to marking/placing the draft over it.
3) If you are a beginner, prefer making the draft on paper and then pin it to the fabric.
I hope you liked this post of a simple baby frock pattern.
If you liked it then Pin it!☺
If you enjoyed this post, please spread by emailing it to a friend, or sharing it on Pinterest, Twitter, or Facebook. Thank you!
I love hearing from readers of my blog so please feel free to leave a comment and let me know what you thought about this or any other post/tutorial given in the blog. Any tips/hints to improve my articles are always much appreciated too!☺☺
Recycle old clothes to something that you can use rather than piling them up in your cupboards. Try to keep only those clothes which you use regularly / occasionally / may hold some sentimental value to it. If you are unable to recycle / reuse them, then best option is to donate such clothes (* only wearable ones). Recycle only those which don't fit you anymore and cannot be altered or are very old and are only occupying your cupboard space.
I have recycled an old denim which was faded and ripped off. The length of this Jeans was 108 cms and waist of 30".
With this post, I am sharing with you how I made a very simple Tote bag from an old denim.
* The pictures and instructions are offered here for free. Please don't repost any of my content without permission. Thanks!
Steps for making a Simple tote bag from an old denim -
Fold the Jeans lengthwise and cut across 10 cms below the crotch.
Cut both seams of each leg. This way you will get 4 separate pieces of denim.
Mark the bag length of 45 cm on each of the 4 pieces. Remaining fabric will be used to make belt of bag.
Stitch and join 2 pieces with plain seam at 1cm and design stitch on right side. Join remaining 2 pieces same way.
Then stitch both side seams either with overlock or double sewn seam.
Stitch the base of bag with double sewn seam at 1 cm and 1.5 cms.
Pull both corners of bag base forming a triangle and stitch at 2"on both sides. Then cut extra corner keeping 1.5 cms allowance.
Stitch lining for bag in same way. You can use and old top as lining.
Put lining inside bag, seams facing each other and double fold the top of bag to do edge machining.
From remaining fabric, make belt and flap.
Stitch Velcro / button to flap and embellish as you desire or keep it simple.
Cat template used for cutting fabric applique
Voila! Your DIY denim Tote bag is done.
Complete cutting and stitching of this recycled denim bag is given in below video ☺️
If you have liked this post then do Pin it!
I hope this post was helpful to you.
Please leave your valuable comments / queries and I will be happy to reply.☺☺
If you enjoyed this post, I’d be very grateful if you’d help it spread by emailing it to a friend, or sharing it on Twitter or Facebook.
We all have those tops / kurtis with beautiful prints and designs which we are unable to wear. This can happen either because they don't fit you anymore ☺ or sometimes we wear them so many times but they still look new. Usually women find it difficult to discard such tops and tend to pile them in their cupboards. I do that sometimes. ☺ I had a very pretty cotton printed kurti which doesn't fit me anymore but I didn't want to discard. This made me think of making a cute summer maxi dress for my daughter.
So I have come up with this dress pattern which is very simple to make and I can assure that by making one you can recycle your old yet beautiful cotton kurtis and make them wearable again.
* The pictures and instructions are offered here for free. Please don't repost any of my content without permission. Thanks!
I have designed this dress by making -
Inverted Box Pleat in centre at waist of front & back
Flared sleeve
Waist band with border design
To begin with, I have first made a yoke pattern of the dress which is given below. This pattern is based on measurements of a 2 year old and I have used it for cutting both front & back yoke.
Then I made the Flared sleeve pattern. For this I used below given basic sleeve draft which is again based on measurements of 2 year old.
Cut and open the above given sleeve draft and then used this as STEP - 1 for making below given Flared sleeve pattern. You have to slit the basic sleeve in centre (i.e. folded paper line) and open the sleeve at hem to add flare (see STEP - 2).
After making the yoke and flared sleeve draft of the Summer maxi dress, you can make inverted box pleat below waist in the dress. For making this pleat, below given is a simple diagram which explains calculation for making a Inverted Box Pleat -
To know the detailed & stepwise method of making this cute summer maxi dress from an old kurti, do watch my DIY video given below.☺
Did you like this tutorial? Wouldn’t it be nice to just say “thanks Shraddha for all your work on this”?
I love hearing from readers of my blog so please feel free to leave a comment letting me know what you thought about this post/make! Any hints or tips to improve my sewing are always much appreciated too!☺
If you enjoyed this post, I’d be very grateful if you’d help it spread by emailing it to a friend, or sharing it on Twitter or Facebook.
Hello everyone,
I am back with one more pattern of saree blouse and this time it is a simple yet stylized saree blouse. This pattern is called as the Sun-rays neckline saree blouse. This blouse has a round neckline in Front and Back. It's called as Sun-rays blouse since 'fine pin tucks' are stitched around it's neckline.
I have taken inspiration for this pattern from my dearest mum's blouse sewing notes.☺ She had done a short course of saree blouse sewing. When I saw this pattern, I found the pin tucks neck design really interesting and so thought of sharing it with all of you.
So let's start with step-wise pattern making of a Sun-rays Neckline Saree Blouse.
* The pictures and instructions are offered here for free. Please don't repost any of my content without permission. Thanks!
Complete cutting and stitching of the Sun-rays neckline blouse is shown in the video given below ☺
To make a Sun-rays Neckline Blouse, all measurements must be taken with great care for precise results.
Some Tip:- It is very important that you wear your best fit under garment (i.e. Bra) in order to get the most accurate measurements. If you think the bra is loose, adjust the straps accordingly, before taking blouse measurements. You can wear a padded bra, though its optional.
Measurements required:-(in centimetres)
1. Length of blouse - Measure from centre of front shoulder passing over the bust point to 5 to 6 cms above waist line. 2. Round Chest - Take it by passing the tape measure around the body under the armpits. Make sure that the tape at back is over the shoulder blades, parallel to the ground and not loose or hanging at the back.
3. Round Bust - Measure around the body at the fullest point of bust. Do not allow the measure tape to fall at back. The tape should pass on the most protruding part of bust.
4. Below Round Bust - Measure around the body and below the bust.
5. Shoulder - Measure from back neck bone to shoulder bone. 6. Distance between bust points - It is the distance between two bust points measured horizontally.
Steps of drafting:-
BACK -
Sun-rays Neckline Saree Blouse
0-1 = Length of blouse + 1 cm
0-2 = 1/5 Round Chest
2-3 & 1-4 = 1/4 Round Bust + 3 cms
3-4 = Join in straight line
0-5 = Shoulder + 0.5 cm
5-6 = Draw straight line
5-7 = Down by 2 cms
0-8 = 1/10 Round Bust
Join 7-8 for Shoulder
0-9 = 1/10 Round Bust (or neck depth)
Join 8-9 for Neckline
Join 3-7 for Arm curve
0-10 = 4 cms
0-11 = 4 cms
1-12 = Keep scale from 1 to 10 and draw line to mark 12 as shown
5-12 = Keep scale from 5 to 11 and draw line to mark 12 as shown.
* 12 is basically intersection point of both lines (i.e. 1-12 & 5-12)
2-13 = Down by 3 cms
13-14 = Join in horizontal line as shown.
Draw curve from 5-14.
Mark following points on this curve-
14-15 = 4 cms
15-16 = 4 cms
16-17 = 4 cms
17-18 = 4 cms
18-19 = 4 cms
19-20 = 4 cms
20-21 = 4 cms
Join following points by drawing line to mark the Sun-rays effect -
15-12, 16-12, 17-12, 18-12, 19-12, 20-12, 21-12.
1-22 = 1/4 Below Round Bust + 3 cms
Join 3-22 for Side seam.
Waist Dart -
1-23 = 1/10 Round Bust + 1 cm
23-24 = 2.5 cms (dart width)
24-25 = Midpoint of 23-24
25-26 = 1/10 Round Bust + 1 cm
Join 23-26-24 to form a dart.
FRONT -
Sun-rays Neckline Saree Blouse
0-1 = Length of blouse + 1 cm
1-2 = 2 cms
0-3 = 1/5 Round Chest
3-4 = 1/4 Round Bust + 4 cms
4-5 & 2-5 = Join in straight line
0-6 = Shoulder + 0.5 cm
6-7 = Draw straight line
6-8 = Down by 2 cms
0-9 = 1/10 Round Bust
Join 8-9 for Shoulder
0-10 = 1/10 Round Bust (or neck depth)
Join 9-10 for Neckline
Join 4-8 for Arm curve
0-11 = 4 cms
0-12 = 4 cms
1-13 = Keep scale from 1 to 11 & draw line to mark 13 as shown
6-13 = Keep scale from 6 to 12 & draw line to mark 13 as shown.
* 13 is basically the intersection point of both lines (i.e. 1-13 & 6-13)
3-14 = Down by 3 cms
14-15 = Join in horizontal line as shown.
Draw curve from 6-14.
Mark following points on this curve -
15-16 = 4 cms
16-17 = 4 cms
17-18 = 4 cms
18-19 = 4 cms
19-20 = 4 cms
20-21 = 4 cms
Join following points by drawing line to mark the Sun-rays effect -
16-13, 17-13, 18-13, 19-13, 20-13, 21-13.
2-22 = 1/4 Below Round Bust + 3 cms
Join 4-22 for Side seam.
Waist Dart -
2-25 = 1/2 Distance between bust points
23-25 = 2 cms (dart width)
24-25 = 2 cms (dart width)
25-26 = 1/10 Round Bust + 2 cm
Join 23-26-24 to form a dart.
Side seam Dart -
4-27 = 1/16 Round Bust + 1 cm
27-28 = 2 cms (dart width)
28-29 = Midpoint of 27-28
29-30 = 1/8 Round Bust + 2 cms
Join 27-30-28 to form a dart.
Centre Front Dart -
3-31 = 1/16 Round Bust + 1 cm
31-32 = 2.5 cms (dart width)
32-33 = Midpoint of 31-32
33-34 = 1/10 Round Bust
Join 31-34-32 to form a dart.
Fabric used:- For making a Sun-rays neckline blouse, you can use thin Poplin, 2 x 2, Khadi, Cambric, Organdy, Taffeta, Satin, Voile etc. However, is you are a beginner, prefer using Cotton Voile fabric. You can also use different fabrics (i.e. plain, printed, embroidered etc) to get variations.
You can also sew the fine pin tucks with matching or contrasting color thread.
Some Tips:- when preparing the fabric for draft placement & cutting:--
1) If using basic woven cotton material, then straighten the fabric by slightly stretching it diagonally to align the warp & weft at right angle.
2) Iron the fabric always to make it crease free prior to marking / placing the draft over it.
3) If you are a beginner, prefer making the draft on paper and then pin it to fabric.
*Once you are successful making a basic blouse you can do variations with use of different neckline shapes for front and back; different types of sleeves; try making with different fabrics like, printed/ embroidered/ checkered / striped etc. Do try and let me know in the comments box below. :)
Placement of FRONT & BACK drafts of Blouse on fabric -
Sun-rays Neckline Saree Blouse
Marking of Seam Allowance -
Sun-rays Neckline Saree Blouse
Cutting of FRONT & BACK drafts of Blouse on fabric - *When cutting the Front & Back of this blouse style, we will cut the neckline and shoulder once all the pin-tucks of neckline are stitched. This is because the fabric will slightly reduced after stitching pin-tucks and so the neckline curve and shoulder line will shift / change.
Sun-rays Neckline Saree Blouse
I hope you liked this post of a simple and yet stylized blouse pattern.
If you liked it then Pin it!☺
If you enjoyed this post, please spread by emailing it to a friend, or sharing it on Pinterest, Twitter, Google+ or Facebook. Thank you!
I love hearing from readers of my blog so please feel free to leave a comment and let me know what you thought about this or any other post/tutorial given in the blog. Any tips / hints to improve my articles are always much appreciated too!☺☺
In my previous post, I had explained pattern making of Two Piece Katori Blouse . In this article, I have explained detailed pattern making of a One Piece Katori blouse with sleeve. The Katori blouse is designed based on the natural bust shape of women. The word "Katori" derived from Hindi language means "Cup".
* The pictures and instructions are offered here for free. Please don't repost any of my content without permission. Thanks!
Fabric used:- For making a Katori blouse with sleeve, blouse fabric should be matching to saree. You can use thin Poplin, 2 x 2, Khadi, Cambric, Organdy, Taffeta, Satin, Voile etc. However, is you are a beginner, prefer using Cotton Voile fabric. Since the Front of this Blouse is divided in four parts you can use different combinations of fabrics (i.e. plain, printed, embroidered etc) to get variations.
To make a Katori Blouse with sleeve, all measurements must be taken with great care for precise results.
Some Tip:- It is very important that you wear your best fit under garment (i.e. Bra) in order to get the most accurate measurements. If you think the bra is loose, adjust the straps accordingly, before taking blouse measurements. You can wear a padded bra, though its optional.
Measurements required:-(in centimetres)
1. Length of front - Measure from centre of front shoulder passing over the bust point to 5 to 6 cms above waist line.
2. Round Chest - Take it by passing the tape measure around the body under the armpits. Make sure that the tape at back is over the shoulder blades, parallel to the ground and not loose or hanging at the back.
3. Round Bust - Measure around the body at the fullest point of bust. Do not allow the measure tape to fall at back. The tape should pass on the most protruding part of bust.
4. Below Round Bust - Measure around the body and below the bust.
5. Shoulder - Measure from back neck bone to shoulder bone.
6. Sleeve Length - Measure the length by keeping the measure tape from neck over shoulder till the fullest part of arm. 7. Round Arm - Measure around the fullest part of the arm which is between the shoulder and the elbow.
Complete cutting & stitching of the blouse is shown in the below given video.
Steps of drafting:-
BACK -
0-1 = Length of front + 1 cm
0-2 = 1/5 Round Chest
2-3 & 1-4 = 1/4 Round Bust + 3 cms
3-4 = Join in straight line
1-5 = 1/4 Below Round Bust + 4 cms Waist Dart -
1-6 = 1/10 Round Bust - 1 cm
6-7 = 2.5 cms (dart width)
7-8 = Midpoint of 6-7
8-9 = 1/8 Round Bust
Join 6-9-7 in slant line for dart
0-10 & 2-11 = Shoulder + 0.5 cm
10-11 = Join in straight line
10-12 = Down by 2 cms
0-13 = 1/10 Round Bust
0-14 = 1/8 Round Bust
Join 13-14 for Neck curve
12-3 for Arm curve
12-13 for Shoulder
3-5 for Side seam
FRONT -
* Pattern is shown in 3 STEPS just to explain how the 3 PARTS of Front are separated later in the draft before placement on fabric.
0-1 = Length of front + 1 cm
1-2 = 2 cms
0-3 = 1/5 Round Chest
3-4 & 2-5 = 1/4 Round Bust + 4 cms
4-5 = Join in straight line
1-6 = 1/4 Below Round Bust + 6.5 cms
0-7 & 3-8 = Shoulder + 0.5 cm
7-8 = Join in straight line
7-9 = Down by 2 cms
8-10 = Up by 2.5 cms
0-11 = 1/10 Round Bust
0-12 = 1/8 Round Bust + 2 cms (or mark neck depth as desired)
Join 11-12 for Neck curve
4-10-9 for Arm curve
Join 4-6 in straight line
PART-1: Katori shape with Dart -
2-13 = go up by 1/10 Round Bust
5-14 = go up by 1/16 Round Bust
14-15 = 1.5 cms
Join 4-15 for Side seam
15-16 = 1/16 Round Bust + 2 cms
13-17 = go right by 3 cms
17-18 = 1/10 Round Bust - 1 cm
18-19 = 7 cms (dart width)
19-20 = Midpoint of 18-19
20-21 = 1/10 Round Bust + 1 cm (dart length)
20-22 = down by 3 cms
12-23 = 1/8 Round Bust
16-23 = Join with a curve
17-24 & 16-19 = 1/10 Round Bust - 1 cm
Join 19-21-24 for dart leg
PART-2:Basque -
(it is the band which is stitched below the bust)
1-25 = 1/10 Round Bust + 1 cm
25-26 = 1/4 Round Bust + 3 cms
26-27 = 1/16 Round Bust + 1 cm
Join 1-27 in curve to form a Basque
PART-3:Side Piece -
(it is the part which joins Katori & Sleeve)
SLEEVE -
STEP-1 - Make the sleeve pattern on folded paper.
0-1 = Length of Sleeve + 1 cm
1-2 = 3 cms
0-3 = 1/5 Round Chest + 2 cms
3-4 & 2-4 = Join points
1-5 = Draw straight line
3-6 = 1/10 Round Chest + 1 cm
1-7 = 1/2 Round Arm + 2 cms
7-8 & 2-8 = Join points
6-9 & 0-10 = 1/4 of 0-6
10-11 = 2 cms
9-12 = 2 cms
6-13 = 2 cms
Join 0-11-13 (Back sleeve curve)
Join 0-12-6 (Front sleeve curve)
Join 6-7-8 for Sleeve side seam STEP-2 - Open the folded paper to cut the front curve (see image) STEP-3- Final sleeve pattern with Front and Back curve.
Some Tips:- when preparing the fabric for draft placement & cutting:--
1) If using basic woven cotton material, then straighten the fabric by slightly stretching it diagonally to align the warp & weft at right angle.
2) Iron the fabric always to make it crease free prior to marking / placing the draft over it.
3) If you are a beginner, prefer making the draft on paper and then pin it to fabric.
*Once you are successful making a basic blouse you can do variations with use of different neckline shapes for front and back; different types of sleeves; try making with different fabrics like, printed/ embroidered/ checkered / striped etc. Do try and let me know in the comments box below. :)
Placement of FRONT pieces, BACK & SLEEVE drafts of Blouse on fabric -
Marking of Seam Allowance -
Cutting of FRONT pieces, BACK & SLEEVE drafts of Blouse on fabric -
I hope this post was helpful to you.
Please leave your valuable comments / queries and I will be happy to reply.☺☺
If you liked this pattern then Pin it!
If you enjoyed this post, I’d be very grateful if you’d help it spread by emailing it to a friend, or sharing it on Twitter or Facebook. Thank you!
I love hearing from readers of my blog so please feel free to leave a comment and let me know what you thought about this post/tutorial. Any tips / hints to improve my articles are always much appreciated too!