
 |
| Scalloped Neckline Saree Blouse |
Hello everyone,
Before I begin today's post, I would like to thank all the lovely subscribers of this blog who have joined the free Newsletter of my blog. I hope you all are notified every time I post an article about different garment patterns.🙏
With this post, I am back with one more pattern of saree blouse and this time it is a stylized deep neckline (scallop shaped) saree blouse. This pattern was requested by one of the subscribers who had sent me below given design for reference.
 |
| Subscriber requested pattern |
You can also visit my new YouTube Channel - "Sudha's Apparel Patterns" for more sewing videos. Please Subscribe the Channel if you like it. ☺
So let's start with step-wise pattern making of yet another Scalloped shaped Deep Neck Saree Blouse.
This deep neckline saree blouse will have only big waist dart in front and basic waist dart at back. You can give any neckline shape of your choice but I have given a slightly wavy scalloped shape to both Front and Back neckline. I have also given slightly wavy shape to the hemline of blouse but you may keep it basic. This blouse will have a back opening.
* The pictures and instructions are offered here for free. Please don't repost any of my content without permission. Thanks!
To make a stylised Deep Neck Blouse, all measurements must be taken with great care for precise results.
Some Tip:- It is very important that you wear your best-fit undergarment (i.e. Bra) in order to get the most accurate measurements. If you think the bra is loose, adjust the straps accordingly, before taking blouse measurements.
You can wear a padded bra, though it's optional.
Measurements required:- (in centimetres)
Measurements required:- (in centimetres)

1. Length of the blouse - Measure from centre of front shoulder passing over the bust point to 5 to 6 cms above the waistline.
2. Round Chest - Take it by passing the tape measure around the body under the armpits. Make sure that the tape at back is over the shoulder blades, parallel to the ground and not loose or hanging at the back.
3. Round Bust - Measure around the body at the fullest point of bust. Do not allow the measuring tape to fall at back. The tape should pass on the most protruding part of the bust.
4. Below Round Bust - Measure around the body and below the bust.
5. Shoulder - Measure from back neck bone to shoulder bone.
6. Distance between bust points - It is the distance between two bust points measured horizontally.
7. Shoulder to bust point - Measure from shoulder at neck to bust point. Also called bust height.
8. Round Neck - Measure around the neck touching front collarbone moderately tight.
7. Shoulder to bust point - Measure from shoulder at neck to bust point. Also called bust height.
8. Round Neck - Measure around the neck touching front collarbone moderately tight.
Steps of drafting:-
BACK -
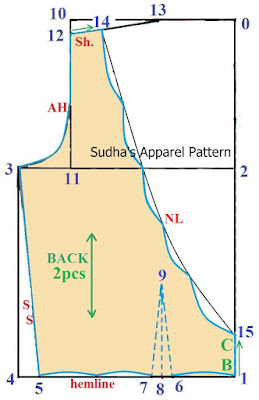 0-1 = Length of blouse + 1 cm
FRONT -
 0-1 = Length of blouse + 1 cm

0-2 = 1/5 Round Chest
2-3 & 1-4 = 1/4 Round Bust + 2 cms
3-4 = Join in straight line
1-5 = 1/4 Below Round Bust + 2 cms
Waist Dart -
1-6 = 1/10 Round Bust - 1 cm
6-7 = 2.5 cms (dart width)
7-8 = Midpoint of 6-7
8-9 = 1/10 Round Bust + 2 cms
Join 6-9-7 in slant line for dart
0-10 & 2-11 = Shoulder + 0.5 cm
10-11 = Join in straight line
10-12 = Down by 2 cms
0-13 = 1/6 Round Neck + 1 cm
Join 12-13 with line
Join 12-13 with line
12-14 = 3 cms Shoulder
12-3 for Arm curve
3-5 for Side seam
Scallop neckline shaping:
1-15 = 5 cms (button stand)
Join 14-15 with a slight curve
Draw scallop design for neckline using this slight curve marked from 14-15 as a baseline.
Scallop neckline shaping:
1-15 = 5 cms (button stand)
Join 14-15 with a slight curve
Draw scallop design for neckline using this slight curve marked from 14-15 as a baseline.

1-2 = 2 cms (for shaping)
0-3 = 1/5 Round Chest
3-4 & 2-5 = 1/4 Round Bust + 4 cms
4-5 = Join in straight line
2-6 = 1/4 Below Round Bust + 4 cms
Join 4-6 for Side seam
Join 4-6 for Side seam
0-7 & 3-8 = Shoulder + 0.5 cm
7-8 = Join in straight line
7-9 = Down by 2 cms
8-10 = Up by 2.5 cms
Join 4-10-9 for Arm curve
0-11 = 1/6 Round Neck + 1 cm
Join 9-11 with line
9-12 = 3 cms Shoulder
Join 4-10-9 for Arm curve
0-11 = 1/6 Round Neck + 1 cm
Join 9-11 with line
9-12 = 3 cms Shoulder
0-13 = 24 cms Neck depth or as desired
Scallop neckline shaping:
Join 12-13 with a slight curve
Draw scallop design for neckline using this slight curve marked from 12-13 as a baseline.
Join 12-13 with a slight curve
Draw scallop design for neckline using this slight curve marked from 12-13 as a baseline.
Waist Dart -
2-14 = 1/2 Distance between bust points
14-15 = 2.5 cms & 15-16 = 2.5 cms (dart width)
11-17 = Shoulder to bust point
Join 16-17-14 in slant line for dart
The fabric used:- For making a Deep Neck saree blouse, you can use thin Poplin, 2 x 2, Khadi, Cambric, Organdy, Taffeta, Satin, Voile etc. However, if you are a beginner, prefer using Cotton Voile fabric. You can also use different fabrics (i.e. plain, printed, embroidered etc) to get variations.
Some Tips:- when preparing the fabric for draft placement & cutting:--
1) If using the basic woven cotton material, then straighten the fabric by slightly stretching it diagonally to align the warp & weft at the right angle.
2) Iron the fabric always to make it crease free prior to marking/placing the draft over it.
3) If you are a beginner, prefer making the draft on paper and then pin it to the fabric.
*Once you are successfully making a basic blouse you can do variations with use of different neckline shapes for front and back; different types of sleeves; try making with different fabrics like printed/ embroidered/ checkered/striped etc. Do try and let me know in the comments box below. :)
I hope you liked this post of a simple and yet stylized blouse pattern.
If you liked it then Pin it!☺
If you enjoyed this post, please spread by emailing it to a friend, or sharing it on Pinterest, Twitter, Google+ or Facebook. Thank you!
Stay connected on
I love hearing from readers of my blog so please feel free to leave a comment and let me know what you thought about this or any other post/tutorial given on the blog. Any tips/hints to improve my articles are always much appreciated too!☺☺
Happy Sewing!

hi sudhaji, thank u so much fr the drafts ! very helpful.i have one doubt..for back deep neckline the shoulder should be decreased right..!? other wise wont it fall off ?
ReplyDeleteshradha ji :) sorry i thought u r sudha seeing the name of the blog
DeleteHello Nirmala ji, you may reduce shoulder by a centimeter if you think the fitting is loose.
DeleteWhen trying out any blouse pattern for first time, I usually make it using a grey/rough fabric and do correction in fittings if any. Once the fitting on sample blouse is satisfactory, I then use the the same to cut fabric for actual blouse. Hope this helps.
Smaller the garment little tricky to stitch. ☺️
Happy sewing!
Thanks for sharing with us about how to make scallop shaped neckline.
ReplyDelete